Redis is an open-source, in-memory data structure store, used as a database, cache, and message broker. Redis typically functions as a flexible database, utilizing a key-value pattern for data storage. Redis enables us to create suitable performance in various operations, while supporting various data storage types such as String, Hash, List, and more. Therefore, Redis is suitable for real-time applications such as online chat systems, online sessions, and values that are constantly updated.
In this tutorial, we will learn how to install Redis on a server with the Ubuntu operating system.
Install Redis and Start the Security Hardening Steps
Typically, Redis is available in the default repositories of the Ubuntu operating system, so we can install it using the apt package manager. After installing Redis, it is necessary to perform the steps related to authentication using a password, connecting Redis to localhost, and also changing dangerous commands that may harm our operating system.
Step 1: Install Redis
Before installing Redis, update the Ubuntu operating system repository packages using the Update command.
sudo apt updateAfter completing the update process, install Redis.
sudo apt install redis-server -y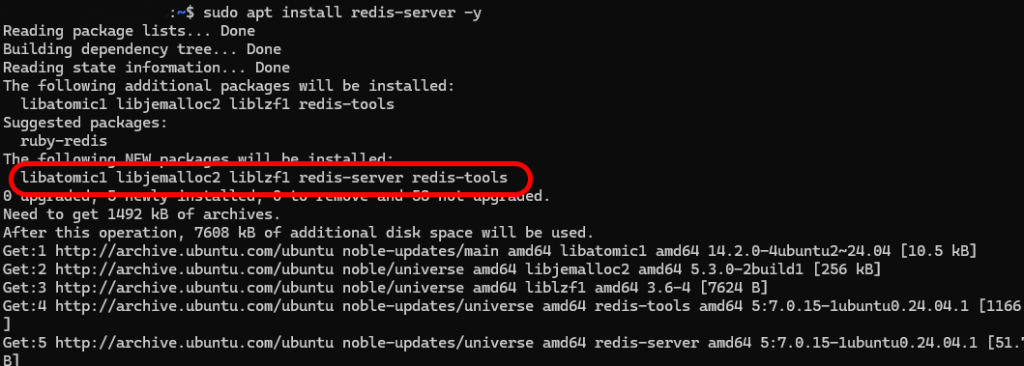
Step Two: Configure Redis
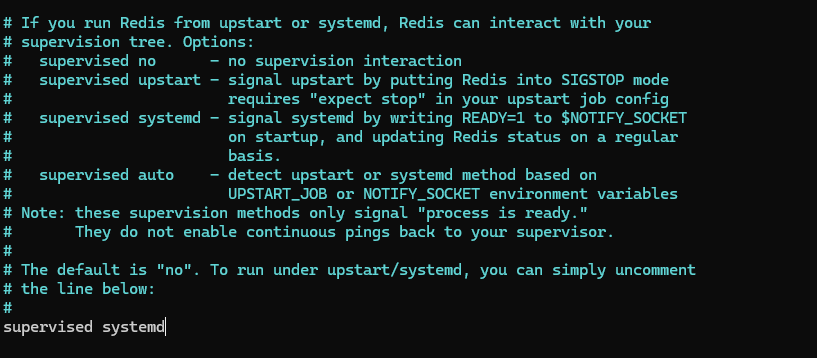
After the installation process is complete, edit the Redis configuration file. The Config file allows you to customize Redis according to your needs, thereby improving its performance, security, and other aspects.
- Open the configuration or config file with an editor (you can use nano).
sudo nano /etc/redis/redis.conf
- Then, in the file’s code, find the section that includes supervised. By default, this line is set to the no or disabled option. However, to set Redis as an executable service, set this section to the systemd option.
- Save the changes and close the file. In the nano editor, saving and closing the file is done with Ctrl+X.
- Finally, restart the Redis service file for the changes to take effect.
sudo systemctl restart redis
Step Three: Verify Redis Installation
To check if the service is running and working correctly, you need to test the connection to the server and verify that it is capable of setting key-value pairs.
- Check the Redis service status
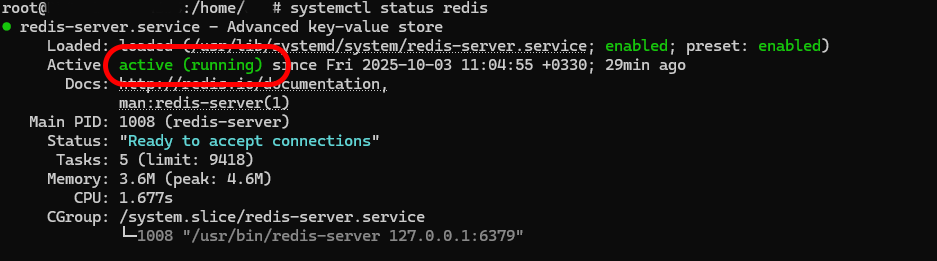
Use the following command to check the Redis service status:
sudo systemctl status redis
The output should include active (running):
If the service status is inactive, start the activation process with the following command:
sudo systemctl start redis
- Check the Redis connection
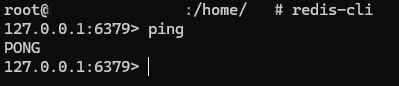
Check the connection status to the Redis server using the redis-cli tool. This tool is the redis command-line environment. Connect to it using the following command:
redis-cli
This command will take you to the redis-cli command environment. To check the connection to the server, enter the following command:
ping
The service should respond by returning PONG:
- Check key-value configuration in Redis
Since Redis is a NoSQL database that uses main memory to store information, it is important to check the values assigned in its key-value and ensure its accessibility.
First, connect to redis-cli:
redis-cli
Then, define a new key in it using the set command:
set key1 "You have successfully set up a key-value pair!"
In this example, our new key is named key1 and contains the text written next to it.
After entering the Enter key, the command environment should respond with the message OK:

Now, check the access to the value assigned to your key using the get command.
get key1
The output should include the message you assigned to the key:

Exit the Redis command environment with the quit command.
quit
Step Four: Secure Redis
Redis security is crucial because, by default, Redis is not built for secure network environments and lacks essential built-in mechanisms such as authentication, encryption, and access control. A Redis configuration exposed on the internet or in an insecure network can cause significant damage to our network.
- Set up Redis authentication.
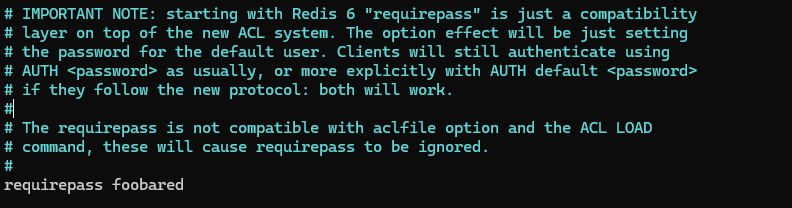
The Redis database includes an authentication feature that can be turned into a protective layer for it. This feature is not enabled by default. You also need to edit the configuration file to set up the authentication system.
Open the Redis configuration file with a text editor. You can use nano:
sudo nano /etc/redis/redis.conf
In the configuration file, find the section of code that includes requirepass. This section is located under the SECURITY section and is commented out by default. Remove the # symbol before requirepass to uncomment it.
Enter a strong password for it after requirepass, separated by a space.
Save the file and exit.
Restart the Redis service.
sudo systemctl restart redis
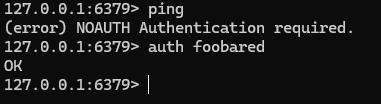
After configuring authentication in Redis, it will not be possible to create any queries or enter any commands until authentication is performed. For example, if you re-enter redis-cli and enter the ping command, the output will display the message (error) NOAUTH Authentication required..
The only way to authenticate is to enter the same password that you entered in the Redis configuration file.
Use the following command to authenticate. Replace [your_password] with the password you set.
auth [your_password]
After entering this command, the OK message will be displayed to you:
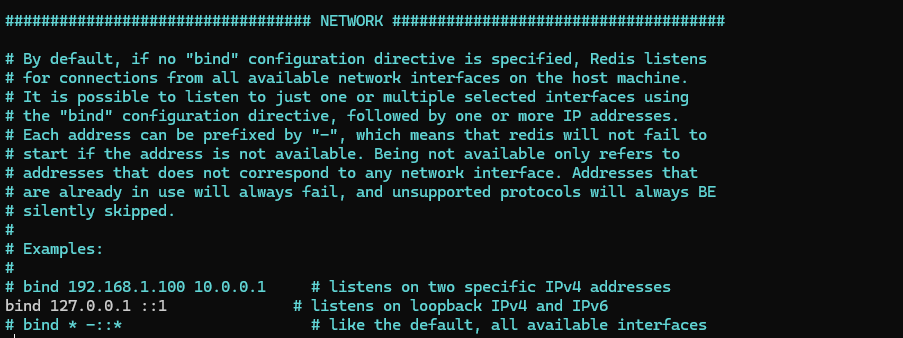
- Connect the Redis Database to the localhost Server
The process you have followed so far to install Redis includes the fact that Redis is only accessible through the localhost server. Restricting this access is one of the most important parts of providing Redis network security.
To prevent external access to localhost, proceed as follows.
Reopen the Redis configuration file:
sudo nano /etc/redis/redis.conf
In the file code, go to the NETWORK section. Then uncomment the code bind 127.0.0.1 ::1 (uncommenting means removing the #)
Save the file and exit.
Restart the Redis service for the changes to take effect.
sudo systemctl restart redis
- Change Dangerous Commands
Another way to protect your data is to disable or rename certain commands so that they are no longer usable. This is a method to increase security, which prevents the use of commands that may damage the system.
Open the Redis configuration file:
sudo nano /etc/redis/redis.conf
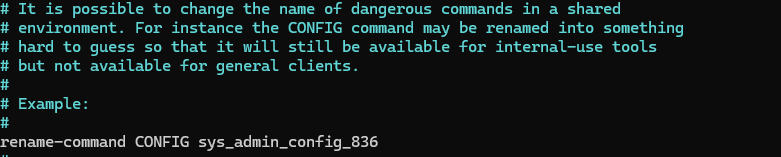
Find the SECURITY section. Scroll down to find Command renaming#. This section contains examples that show how we can rename or disable a command.
For example, to rename the CONFIG command, enter the following line. In the [new_command_name] section, you must enter your desired command.
rename-command CONFIG [new_command_name]
In this example, we changed the config command to sys_admin_config_836. This is to prevent ordinary users from easily finding the command we have configured:
To completely disable a command, or in other words, to “kill” the command so that it is no longer usable, we use the same method but with an empty string.
For example, to disable the CONFIG command, we add this line to the configuration file:
rename-command CONFIG ""
Then, as usual, we restart the Redis service for the changes to take effect.
sudo systemctl restart redis