Maintaining security in the connection between a user and the server is one of the most important requirements. For Linux users, the best way to connect remotely to a website is through a secure and encrypted protocol, using SSH (Secure Shell).
The SSH protocol encrypts all information transmitted from one device to another. This protocol also ensures that none of the sensitive information is compromised during the transfer.
In this tutorial, we will learn how to enable SSH on the Ubuntu operating system.
How to Enable SSH on Ubuntu
The SSH Server tool is not installed by default in all versions of Ubuntu. To install SSH on Ubuntu, follow these steps:
- Enter the Terminal (command line environment) in Ubuntu and use the following command to check if SSH is installed on your operating system:
ssh localhost

If you encounter the SSH “Connection Refused” message, it means that SSH is not installed on your system and you need to complete the installation steps.
- To ensure you receive the latest version of SSH, first run the update command in your terminal to update the list of tools available in your Ubuntu operating system’s repository:
sudo apt update
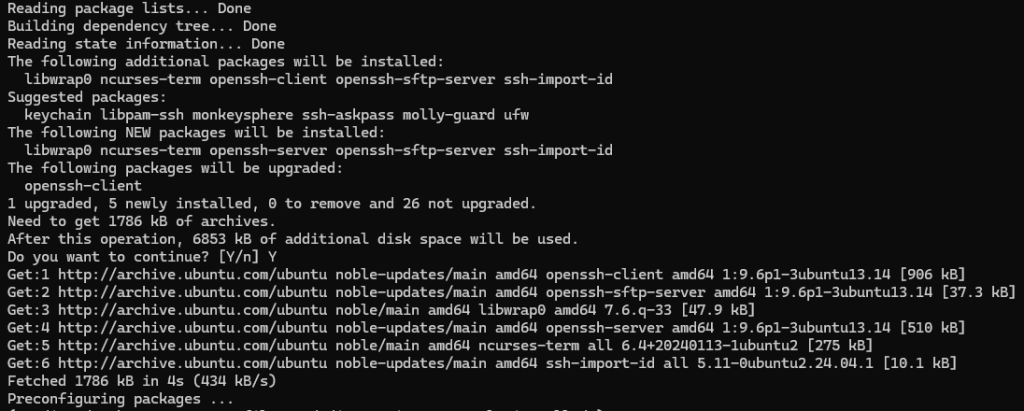
Use the following command to install the OpenSSH software:
sudo apt install openssh-server
Then, by checking the service related to this tool, make sure that the SSH installation was successful:
sudo service ssh status
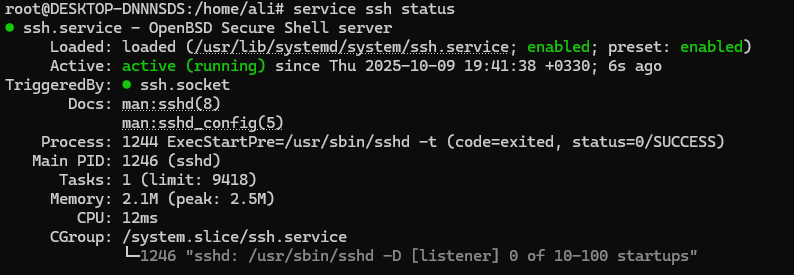
The message Active: active (running) means that the SSH service is active on your Ubuntu operating system. If you encounter another message and your service is inactive, activate it using the following command:
sudo service ssh start
You can use q to return to the command environment.
SSH Configuration in Ubuntu
The default SSH configuration is editable and can be changed. You can change the SSH connection port, which is a way to increase security on your server. It is also possible to disable root access. You can implement your desired features through SSH configurations.
Editing the SSH Configuration File in Ubuntu
After installing OpenSSH in Ubuntu, you need to edit its configuration file to apply security features.
- Open the SSH configuration file using a text editor through the path in the command. You can use nano:
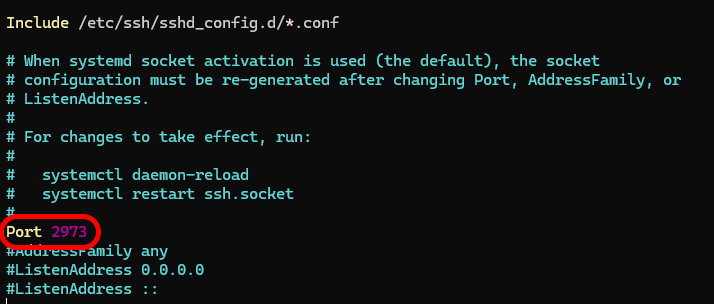
sudo nano /etc/ssh/sshd_config
- Edit the default port number in it. For example, set the TCP port number to 2973 to force the service to listen to this port address and not port 22. This will make logging in through port 22 impossible. Find the line for port 22 and change it. Then you can save the file and exit.
Disabling Root Login
Another security feature in establishing an SSH connection that you can apply to your server is disabling root user access. In this case, the root user will not be accessible remotely, which will increase security.
- In the configuration file, find the following line:
PermitRootLogin yes
Uncomment the line (by removing the # symbol before it) and change it to this text:
PermitRootLogin no
If this line does not exist in your file, you can add it.
- For the changes to take effect on the server, restart the SSH service as follows:
sudo systemctl restart sshd.service
Firewall Configuration: Changing the Default Port Address
If you intend to change the default SSH port on your server, you need to modify your firewall configuration to allow traffic from your desired port address. In this example, we will use port address 2973.
The default tool in the Ubuntu operating system for firewall configuration is UFW. Use the following command in the UFW tool to allow traffic from port 2973:
sudo ufw allow from any to any port 2973 proto tcp
In some firewalls, it may be necessary to allow traffic on the server’s public IP address as well, in order for traffic to pass through.
If you still haven’t decided to change your SSH port address and are using the default port 22, these steps are not required.
Connecting to an Ubuntu Server Using SSH
After completing the SSH activation steps in Ubuntu, you can connect to it remotely.
Open a Terminal or Command Line environment on your system. You can create an SSH connection to your Ubuntu server with the following command:
ssh [username]@[public_IP] -p[port_number]
- The [username] section is the account name you want to use to connect to your server.
- The [public_IP] section is the public IP address of the server you want to connect to.
- The [port_number] section is the port address that you entered in your SSH server configuration. This number is by default port 22.
Change the username and public_IP sections to your account username and the server’s public IP address, and then connect to it via SSH.
To find the public IP address on your server, enter the following command in its terminal:
ip a
This command displays the public IP address of your device in the Ubuntu operating system.
After entering and confirming the information, you will enter the server.
SSH Commands in Ubuntu
After enabling SSH in Ubuntu, you can use several different commands to manage different sections. These commands allow users to connect to their server practically, manage different sections, and also apply various security measures in their sessions with the server.
- Remote connection to a device
To connect to a device using SSH, use the following command:
ssh [user]@[remote_host]
Replace [user] with your username and [remote_host] with the public IP address of your host server (the server you want to connect to remotely).
- Using a specific port in SSH connection
Using the following command, you can also enter the port address for the connection in the SSH connection to the server:
ssh -p[port_number] [user]@[remote_host]
The -p option in the command allows you to enter the port address when connecting via SSH. If you have previously changed the Port address in the SSH configuration file, you need to enter it when connecting to the server.
- Copying files between the user’s system and the server
Using the scp command, you can copy and transfer your desired files between your system and the destination server:
scp [file] [user]@[remote_host]:/path/to/destination
The [file] section is the name of the file you want to create a copy of. This command must be executed on the source system.
The [user] section is the username for connecting to the server.
The [remote_host] section is the IP address or hostname of the destination server.
The path/to/destination section is the directory path where you want to copy your file.
- Adding an SSH key
Thessh-copy-idcommand creates an authentication system by copying your public SSH key to the destination server. This allows you to log in to the server without using a password. This creates a secure and convenient connection to the server.
ssh-copy-id user@remote_host
To do this, you must have created an SSH key for yourself. This command transfers your SSH key to the destination server.
- Check the status of your SSH connection
By adding-vto the command, you can see details about the SSH connection process. This command is useful when you want to troubleshoot SSH connection problems or to be informed about the authentication process during an SSH connection.
ssh -v [user]@[remote_host]
Troubleshooting SSH Errors in Ubuntu
You may encounter several different errors when connecting to a server via SSH, and the reasons for these errors can vary.
Problem Identifying the Destination Server Name
This error may occur when connecting to the destination server via SSH. Also, these errors may be related to DNS problems or incorrect configurations in the Configuration files.
ssh: Could not resolve hostname example.com: Name or service not known
To fix this error, do the following:
- Check the name you entered as the destination hostname for the connection. Make sure you have entered the destination server name correctly. This name can be a domain that points to that server.
- Ping the destination server. Use the ping command to make sure the connection between the destination server and your device is established.
- Use the public IP address. Try connecting using the IP address instead of the hostname domain name.
Connection Timeout Error
A Connection Timeout error occurs when a user attempts to connect via SSH, but the server does not respond in a timely manner. This issue can be due to the connection being blocked by a firewall, an incorrect IP address, or a problem with the quality of the internet connection.
ssh: connect to host 203.0.113.0 port 22: Connection timed out
To resolve such errors, proceed as follows:
- Double-check the destination server’s IP address.
- Check your network port restrictions. Some internet connections may restrict port 22 or the port configured in the SSH connection. Connect the port address to another server that you are sure is active and functioning correctly to ensure that there are no restrictions on its port.
- Ping the destination server. Use the ping command to ensure that the connection between your device and the destination server is established.
- Check firewall rules. Make sure that traffic is allowed through the SSH connection in your server’s firewall. If you are using UFW, run the following command:
sudo ufw allow ssh
Permission denied
The permission denied error occurs when the server does not validate your public key during authentication. This error usually occurs due to incorrect configuration or failure to apply the correct permissions to files on the destination server.
Permission denied (publickey)
- Make sure your public key is copied correctly to the server. Copy your SSH key to the server again using the
ssh-copy-idcommand. - Check file permissions. Make sure that the permissions in the .ssh directory and the authorized_keys file on the destination server are set correctly. Change the permissions of your files using the
chmodcommand:
chmod 700 ~/.sshchmod 600 ~/.ssh/authorized_keys
Connection Refused Error
The Connection Refused error means that the user and the destination server are connected, but the SSH server does not acknowledge the connection. This error can occur because the SSH service is disabled or accepts connections from a different port address. Also, the connection may be blocked by firewall rules.
ssh: connect to host 203.0.113.0 port 22: Connection refused
- Make sure SSH is running on the server. Make sure the SSH service is running:
sudo systemctl status ssh
If the service status is inactive, reactivate it with the following command:
sudo systemctl start ssh
- Make sure you are using the correct port for the SSH connection. If you have changed the SSH connection port, use it to connect.
- Check the firewall configuration. Make sure that your server’s firewall rules allow traffic through the SSH ports.
Disabling SSH on Ubuntu
To temporarily disable SSH:
sudo service ssh stop
To re-enable SSH:
sudo service ssh start
To completely turn off SSH:
sudo systemctl disable ssh
To turn SSH back on:
sudo systemctl enable ssh